When managing room reservations or equipment rentals, you can use the Reservation System in Ragic Reports, allowing users or customers to make reservations.

To use the Reservation System, you need a specifically designed sheet. You can install the Meeting Room Manager or Meeting Room Manager (Open to Public) template from the Administration category in Install Templates and modify it as needed (for detailed instructions, please refer here).
If you want to build the sheet from scratch, please refer to the field settings below.
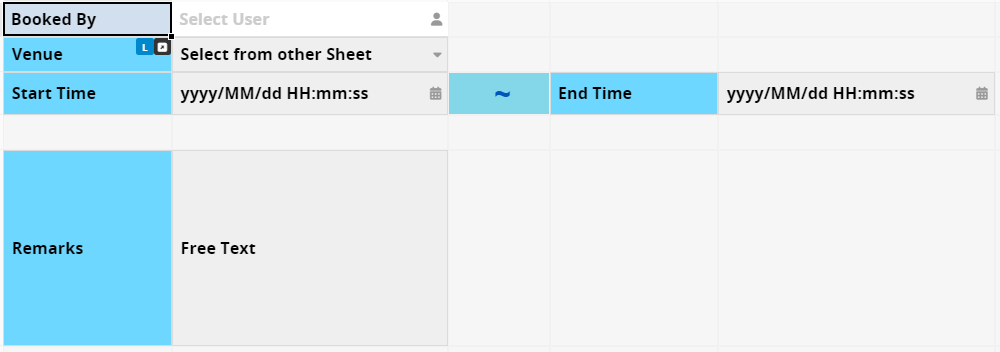
When creating the sheet, ensure that it includes at least the following five types of fields:
1. Reserved By: The person making the reservation. This field does not support Numeric/Money/Date fields. Below are four recommended field types, which can be chosen based on the applicable scenario:
(1) Select User Field: Allows only internal and external users to make reservations. You can set it to Defaulted to current user, automatically selecting them during the reservation.
(2) Email Field: Allows users without accounts to make reservations. When configured to allow reservations by users without accounts or those not logged in, you may enable Guest User Email Validation to send reservation information via email to the users.
(3) Free Text Field: Allows users without accounts to make reservations, but unlike the Email Field, it does not provide notification features.
(4) Linked or Selection Field: Allows users who exist in the linked source sheet or selection menu of internal/external users to make reservations.
2. Item: The item to be reserved, supporting Selection and Linked fields. Common item types include meeting rooms, equipment, classes, doctor appointments, etc.
3. Start Time: The start time of the reservation supports only the Date fields. The format must include both date and time, such as yyyy/MM/dd HH:mm:ss.
4. End Time: The end time of the reservation supports only the Date fields. The format must include both date and time, such as yyyy/MM/dd HH:mm:ss.
5. Remarks: It is recommended to use a Free Text Field, which can be used to fill in the reason for the reservation or any additional remarks.
To allow users to create and access reports in the reservation sheet, they must have Access Rights to the source sheet and the Create & View Report feature in the Feature Access Settings. The following are two scenarios:
1. Internal/External Users: Grant Access Rights to both the internal user group and the external user group for the reservation sheet.
2. Users Without Accounts or Not Logged In: To allow access for users who are not logged in or do not have an account, grant Access Rights to the Everyone group.
Access Rights can be set to Survey User, Bulletin User, or Admin, depending on your needs.
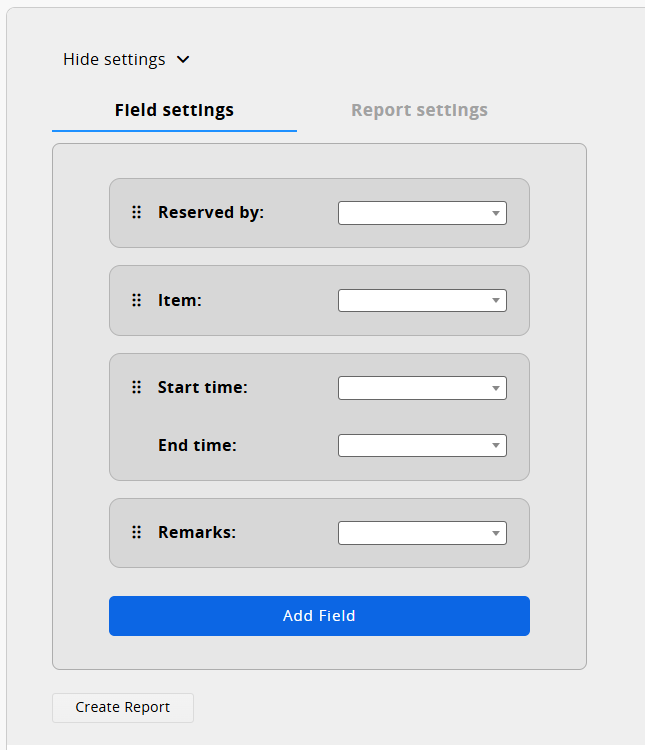
After creating the Reservation System, the following page will appear.
Only the SYSAdmin and Group Administrator can access the configuration interface. This differs from other Ragic reports, where users can configure and create reports. In the Reservation System, users can only make reservations with pre-configured settings.
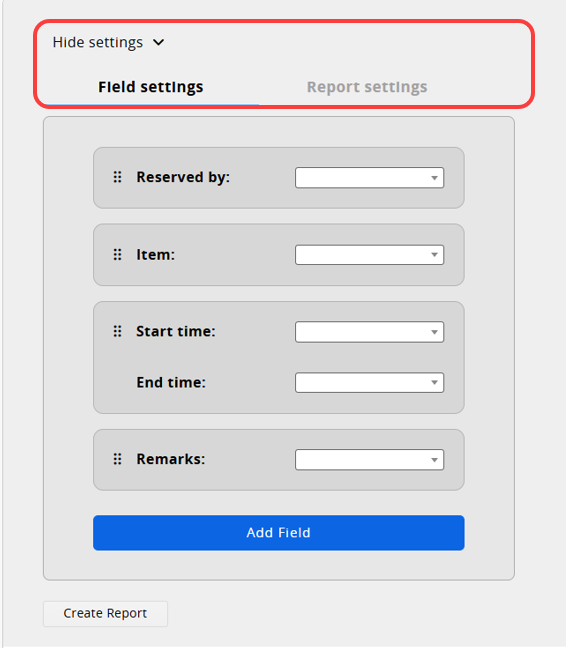
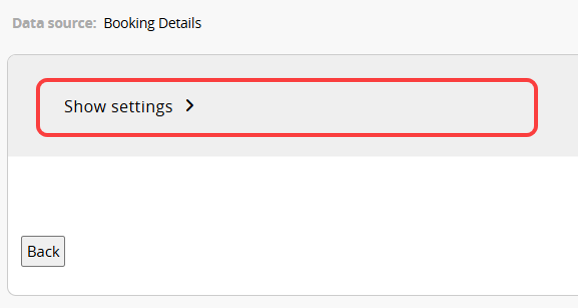
The settings include Field Settings and Report Settings. You can click "Hide settings" at the top to hide the interface and "Show settings" to reopen it.
Select the five required fields in the sheet, which must be included in the design: Item, Start Time, End Time, Reserved By, and Remarks.
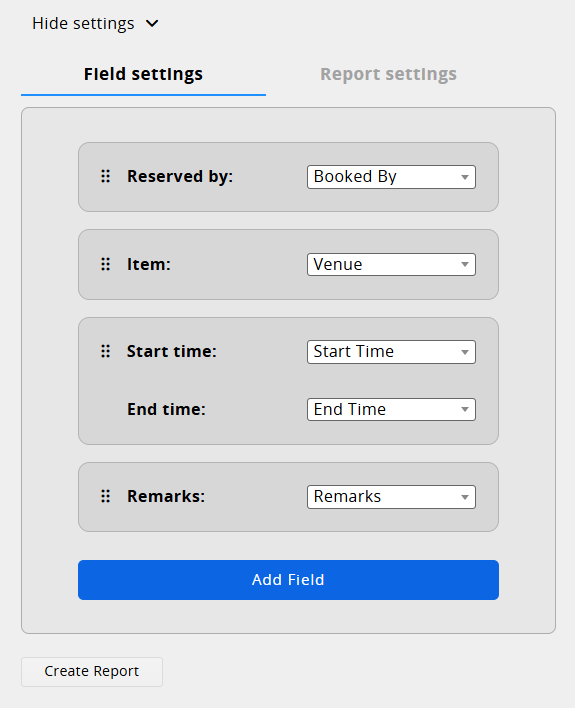
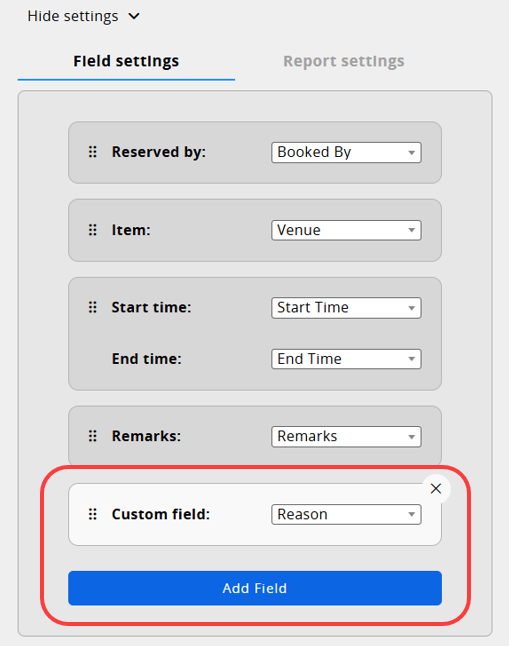
You can also add Custom fields, which can be of the following types: Free Text, Numeric, Date, Phone, Email, and Selection fields. Click the X in the top right corner to remove an added field.
Drag and move fields to adjust their display order.
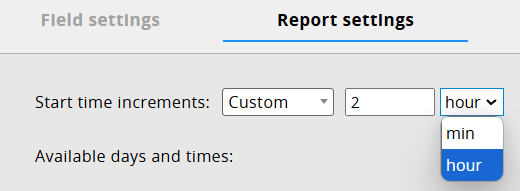
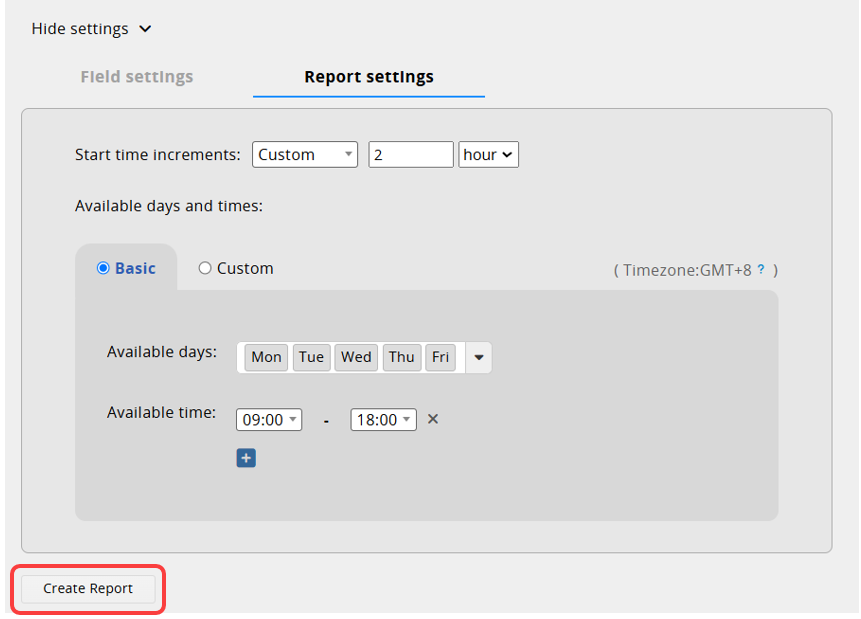
In Report Settings, you can configure settings related to reservation time.
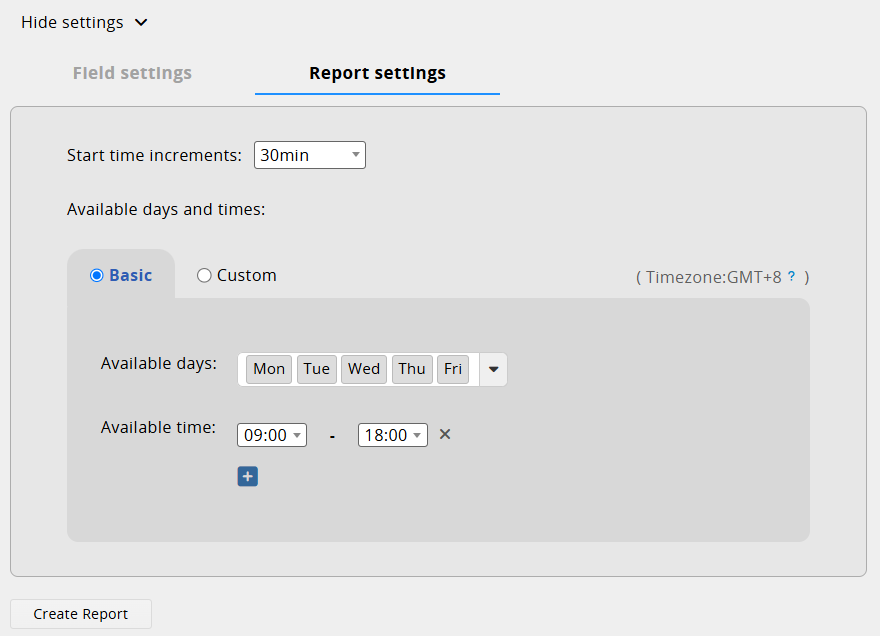
Start Time Increments: Set the time length for each reservation session, such as 15 minutes, 30 minutes, or 60 minutes.
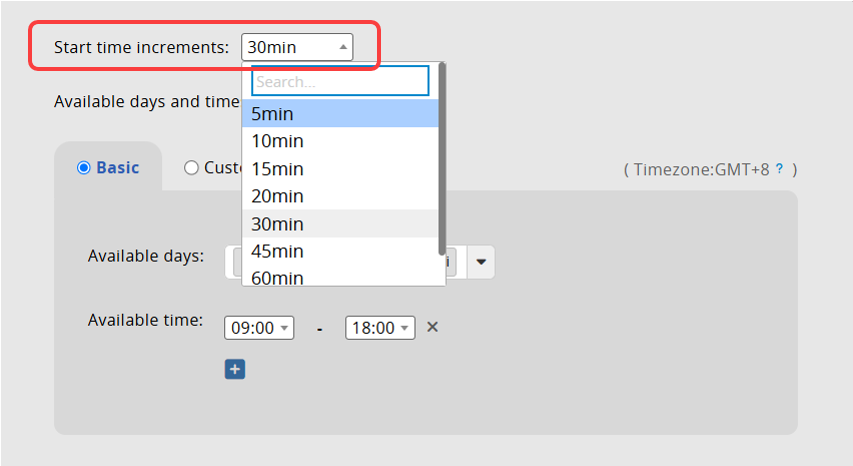
If none of the options fit your needs, you can also choose a "Custom" increment. For example, you can set the increment for each reservation session to 2 hours.
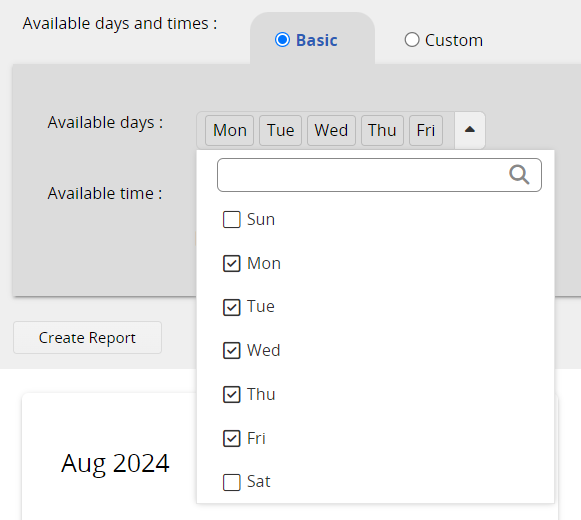
Available Days and Times: Set the available reservation times for each week and day, divided into "Basic Settings" and "Custom Settings." The times are based on the Company Local Time Zone in Company Settings.
1. Basic Settings: You can configure the following:
(1) "Available Days": Choose which days of the week, from Monday to Sunday, are available for reservations.
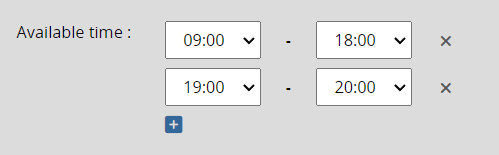
(2) "Available Time": Set the time increments available for reservations each day. Click the "+" button to add more time increments.
2. Custom Settings: You can configure more complex settings:
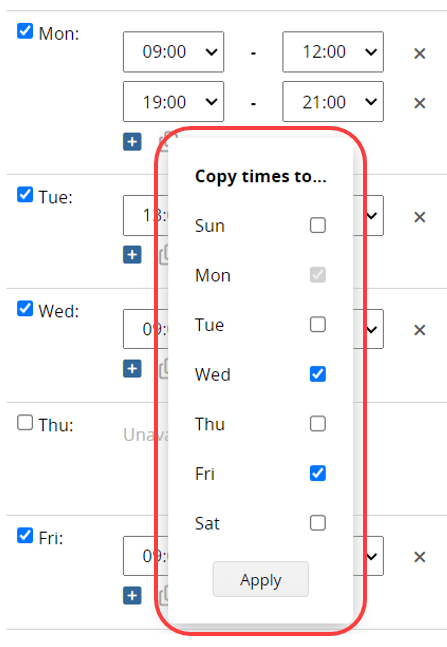
(1) "Set Different Available Times for Each Day": Click the "+" button to add more time increments. For example, you can set morning and evening increments on Mondays, Wednesdays, and Fridays, and only afternoon increments on Tuesdays.
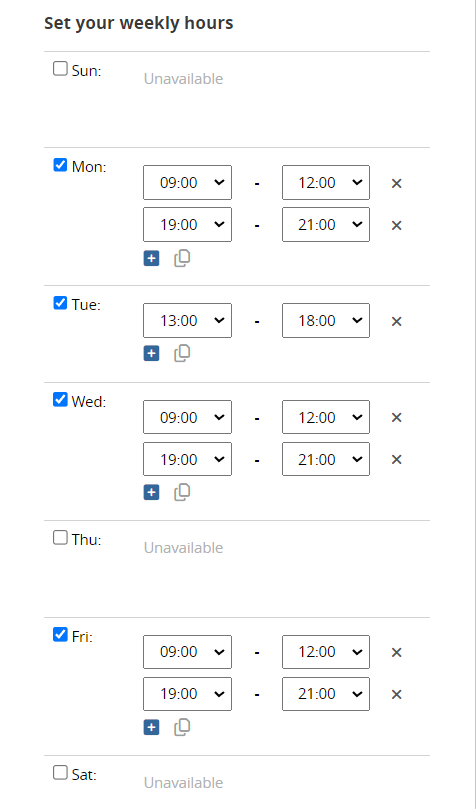
Additionally, after setting the time increments for a specific day, you can click the ![]() icon below to apply the same settings to other selected days.
icon below to apply the same settings to other selected days.
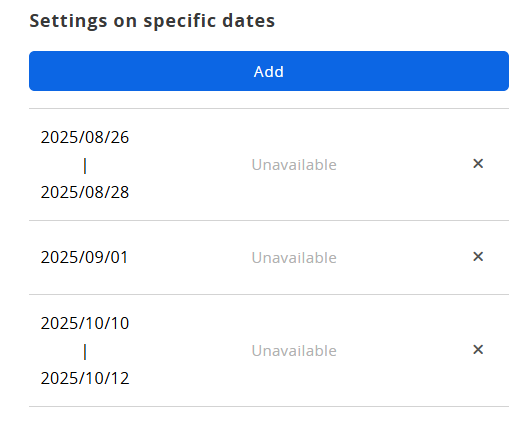
(2) You can also set specific dates to be available or closed. For example, on 9/1(Mon), which is a public holiday, reservations will be closed for the day.
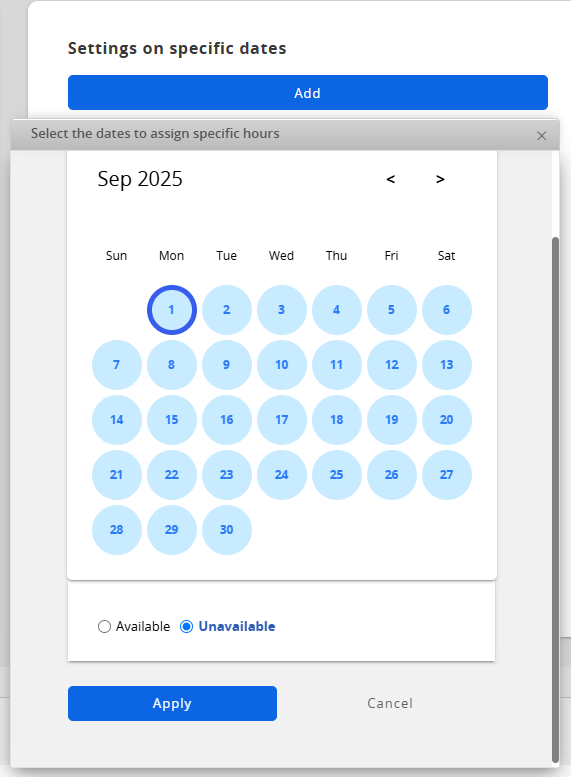
You can click "Add" to include different settings and select multiple days.
After completing all the settings, click Create Report at the bottom, and save the report to allow users to start using the Reservation System. Additionally, you can embed the report into the page where you want users to make reservations.
Users can access the designed Reservation System report through the report tab or by visiting the embedded report page or URL.
After entering the Reservation System, start by selecting a date from the left section. Dates with a gray background indicate that the day is fully reserved, and no reservations can be made. Additionally, past dates will not be displayed.
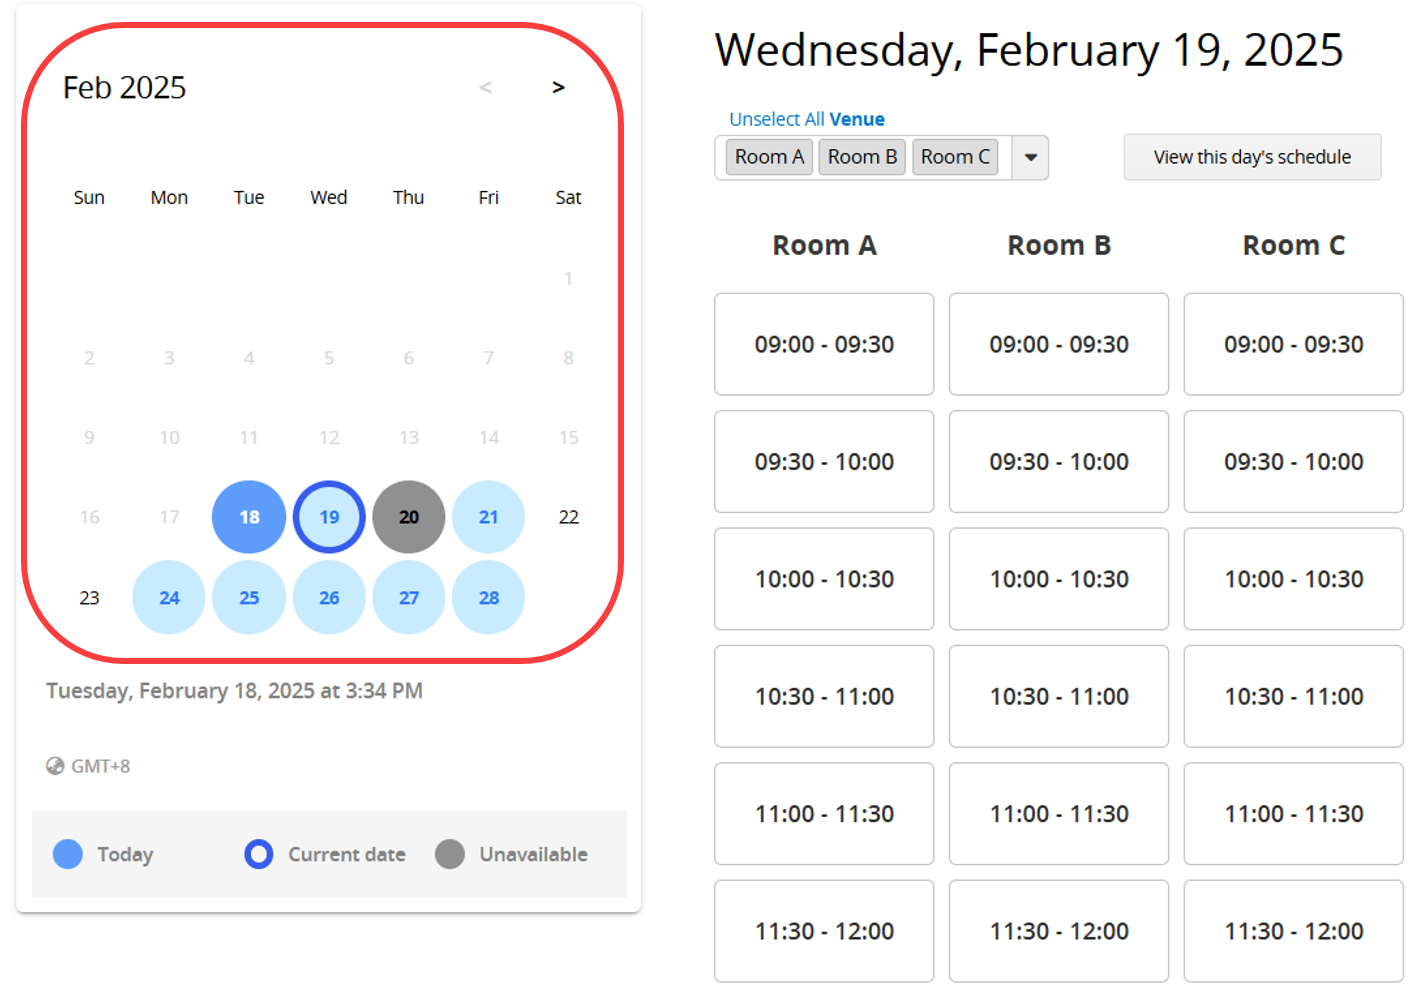
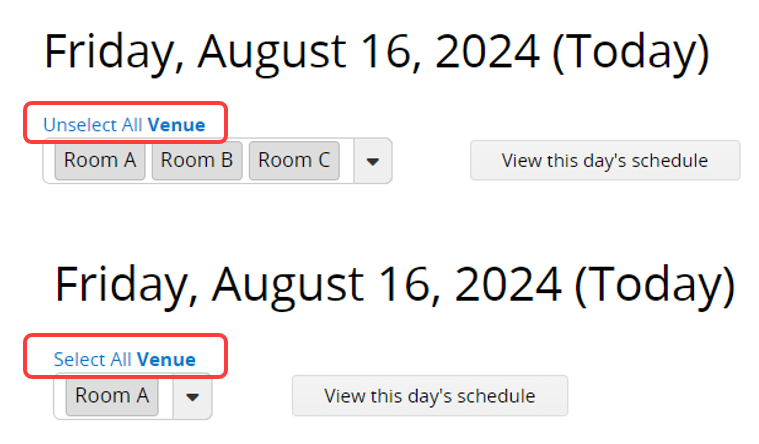
After selecting a date, choose the desired item from the options in the top-right section. Click the arrow to choose the items.
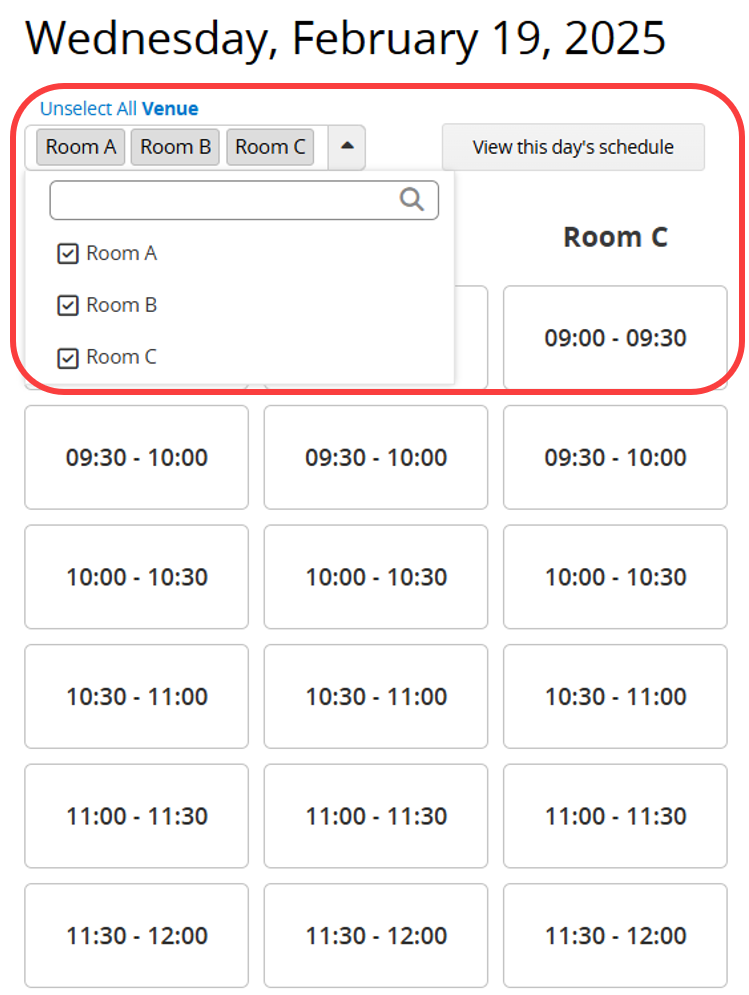
By default, all items are displayed. Click "Unselect All Items" at the top to clear all selections and choose items again. If you deselect some items, the option at the top will change to "Select All Items", allowing you to reset the selection.
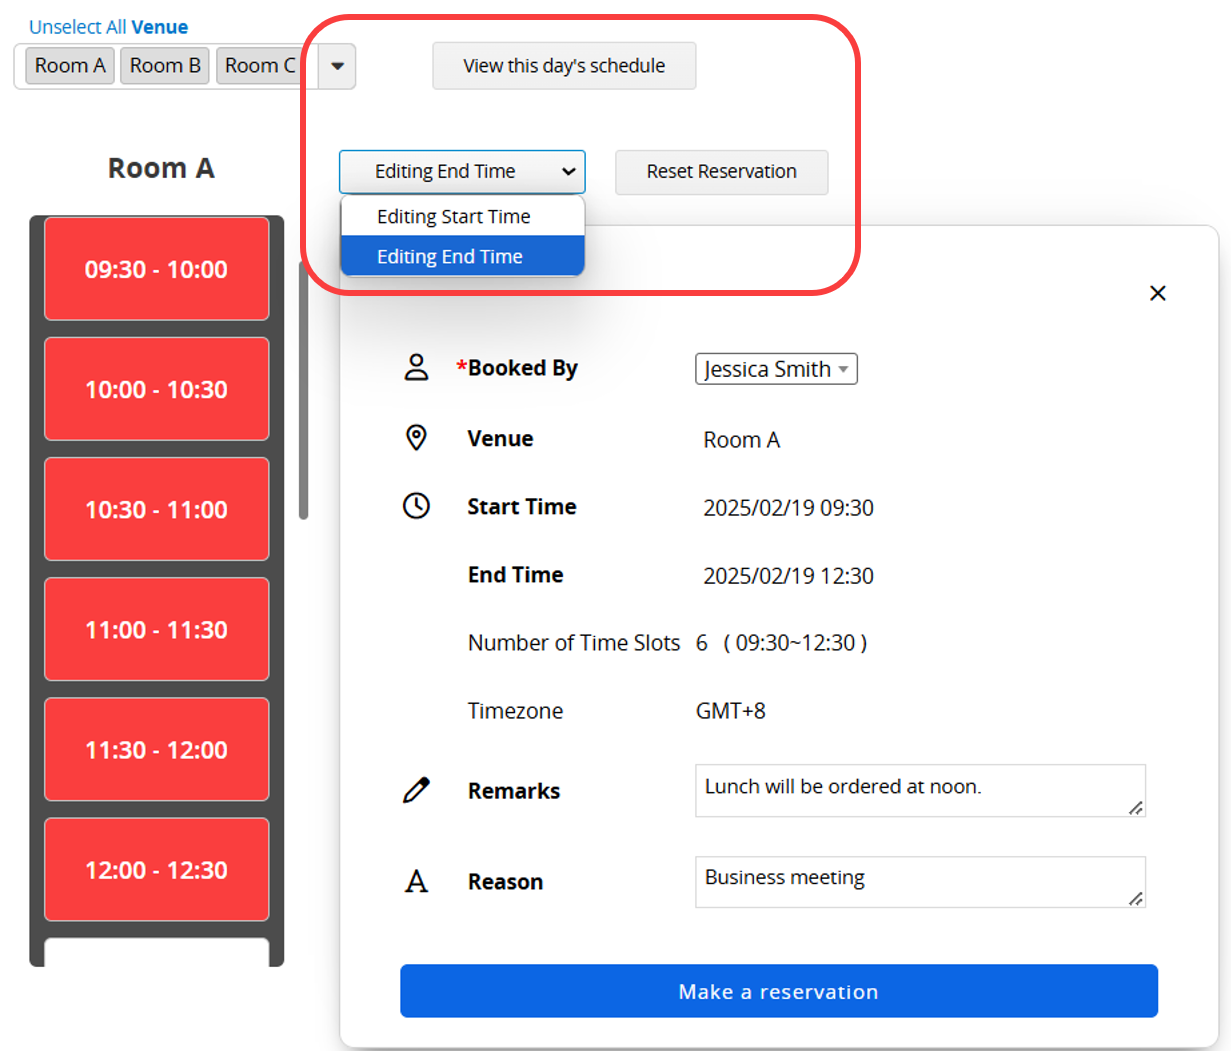
After selecting the item and time increment, the following page will appear. You can choose the "End Time", select the "Reserved By", and fill in the "Remarks" and other Custom fields. Once you have made these configurations, click Make a Reservation.
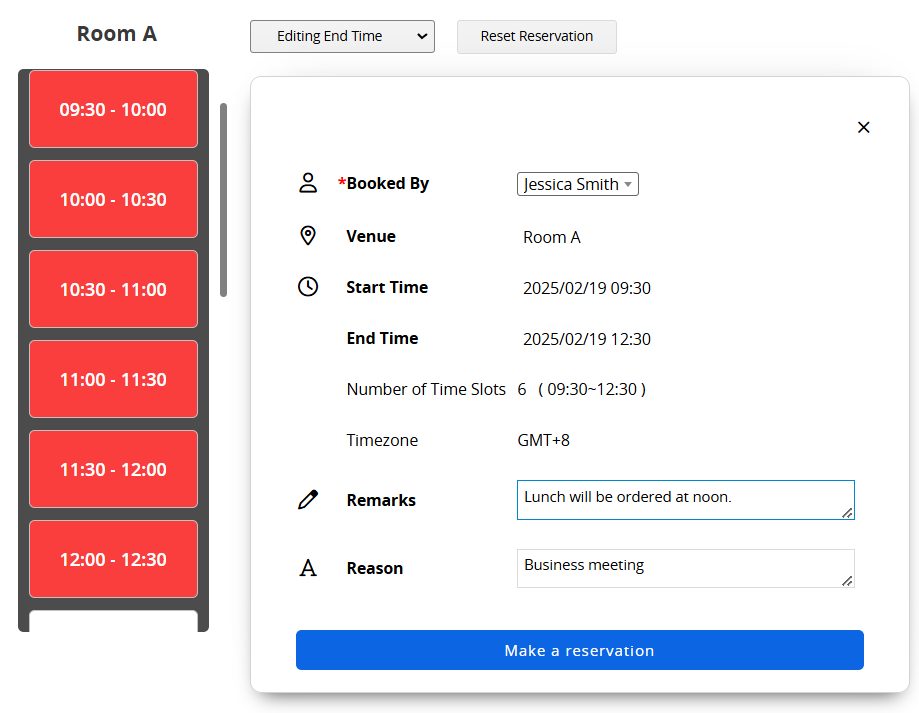
Additionally, you can edit the "Start Time" and "End Time", or directly click "Reset Reservation" for this item. If you want to reselect the item, click "View This Day’s Schedule" to return to the previous page.
After making a reservation, the process differs for internal/external users and users without accounts or who are not logged in:
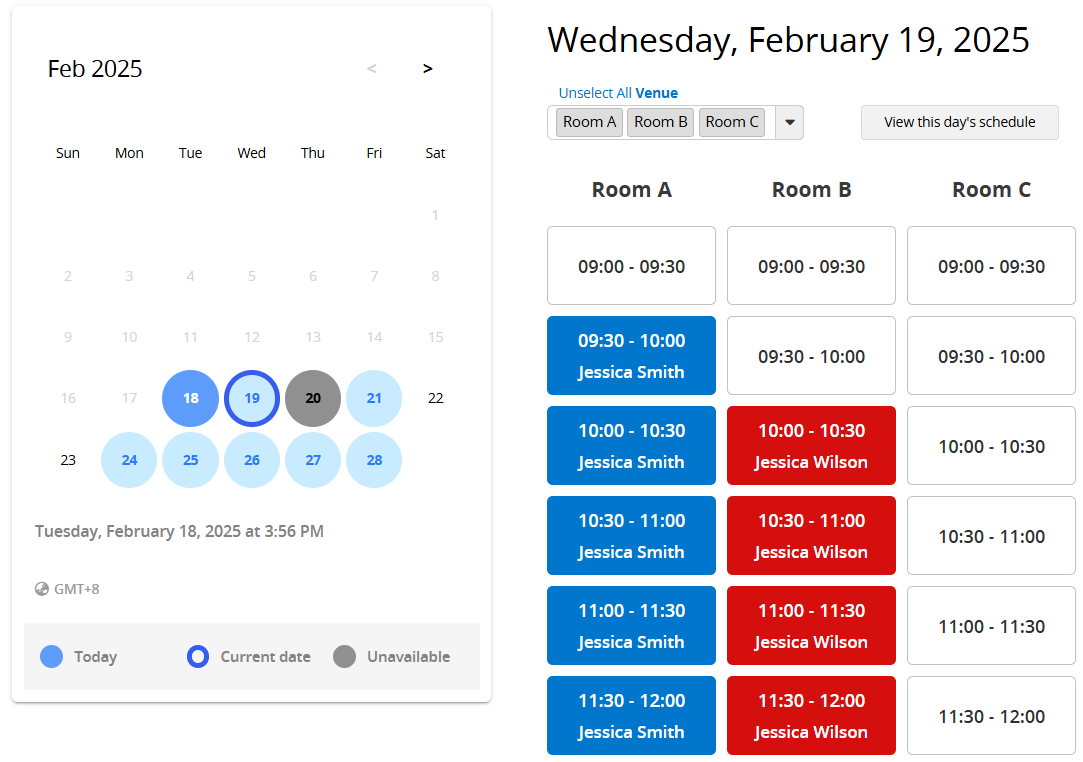
1. Internal/External Users: The reserved time increment will appear in red. Depending on the user's Access Rights, reservations made by others may display differently.
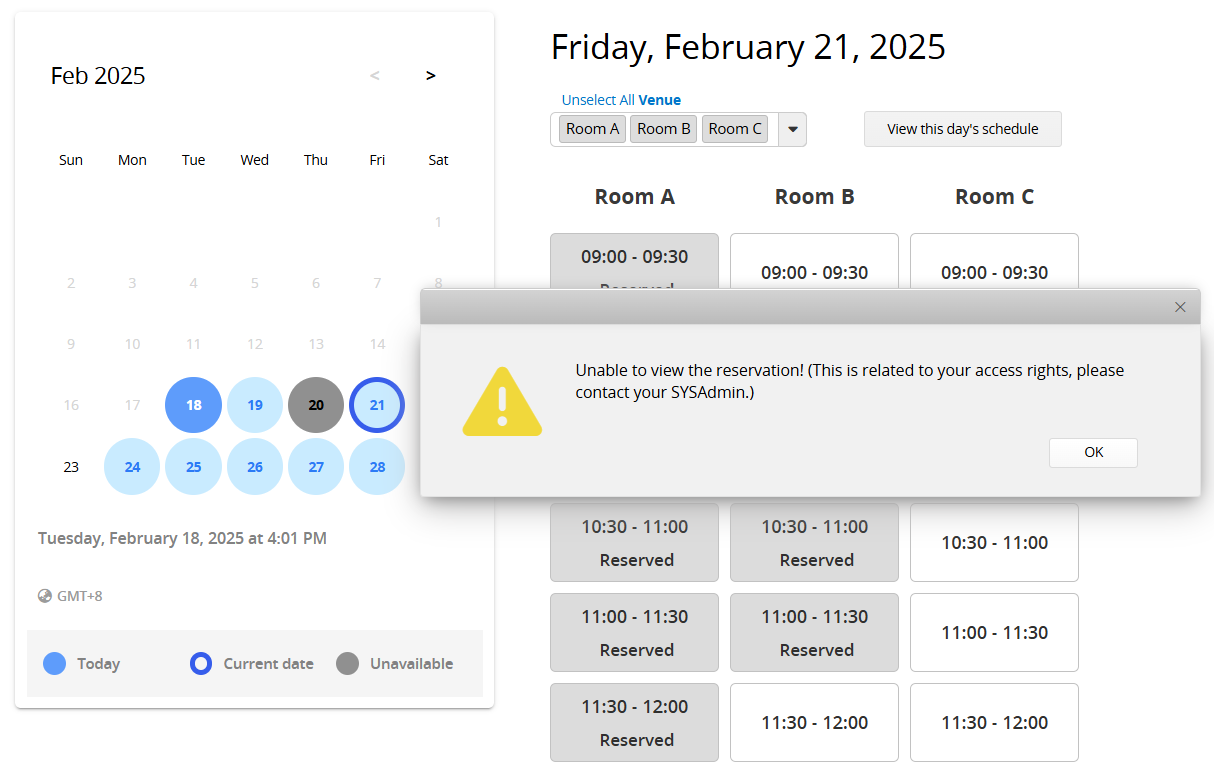
(1) For Survey Users, other users' reservations will only show as gray and marked as "Reserved," without revealing who made the reservation.
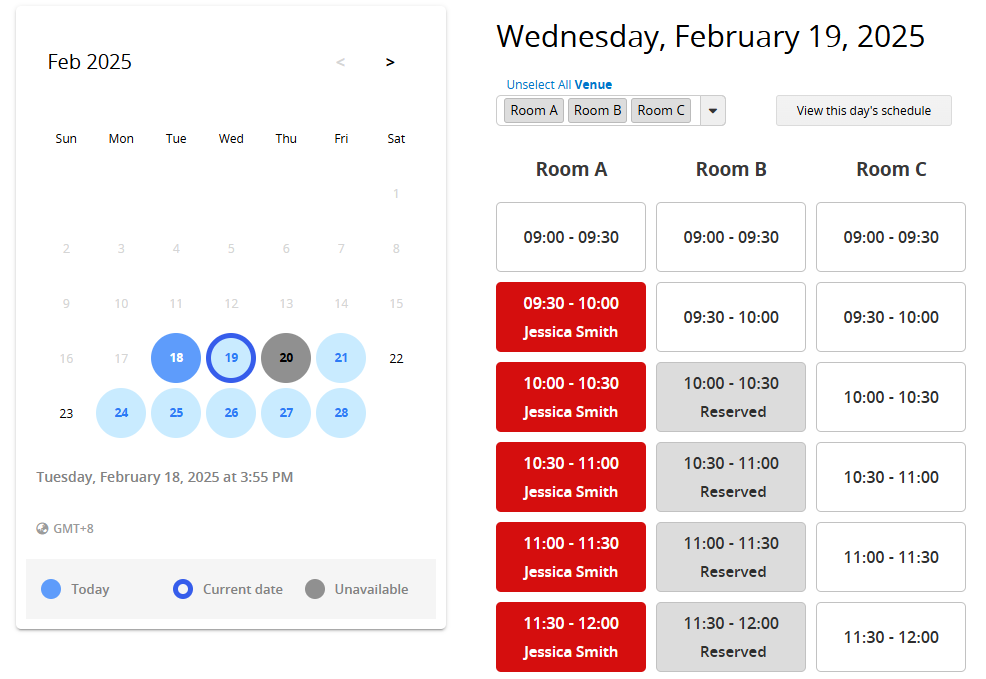
(2) For Bulletin Users or above, time increments reserved by others will appear with a blue background and display the name of the person who made the reservation.
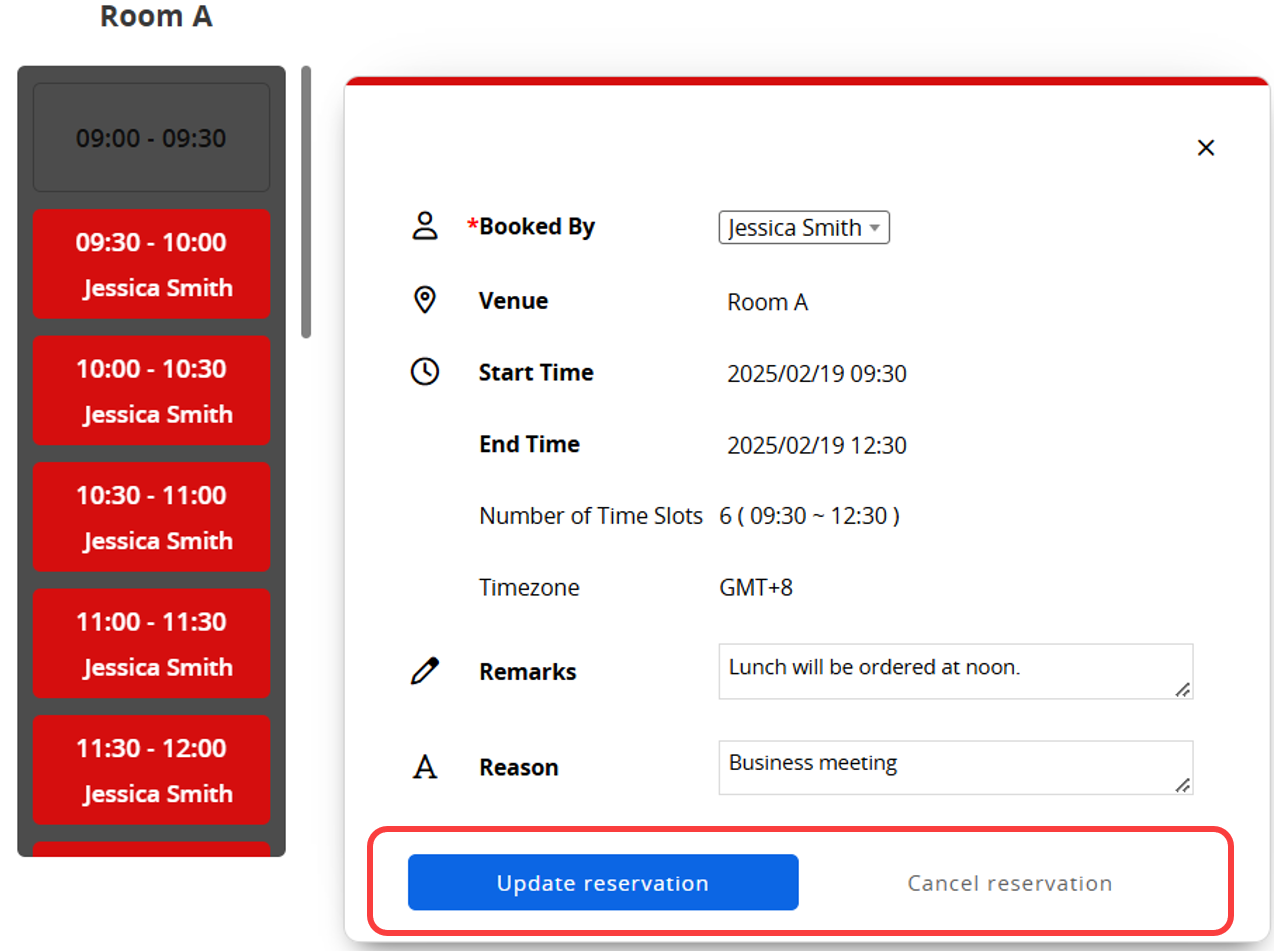
After clicking on your reserved time increment, you can update the reservation details and click "Update reservation." If you want to cancel the reservation or change the reserved item or time increment, click "Cancel reservation" to make a new reservation.
2. Users without accounts or not logged in:
They can only confirm and modify reservation details during their initial reservation. After closing the browser window, they cannot modify previous reservations upon re-entering the system. The reservation will simply display as "Reserved", and clicking on it will show a notification indicating no Access Rights.
If users need to modify a reservation again, besides having SYSAdmin make changes, you can enable Guest User Email Validation to grant temporary access for viewing and modifying reservations. Users who access the reservation page via the link in the notification email will have temporary access to modify their previous reservations.
You can learn more about Reservation System applications in the following articles:
2. Advanced Reservation System Applications: CRM Integration, Service Selection, and More
You can embed the report into your website or share a link with others.
In the Report Settings, you can adjust the report’s style settings, including font, font size, borders, etc., and the report’s Filter and Access Rights.
 Thank you for your valuable feedback!
